At the top of the patent results, you can find an array of icons. These icons are tools for managing the patent list.
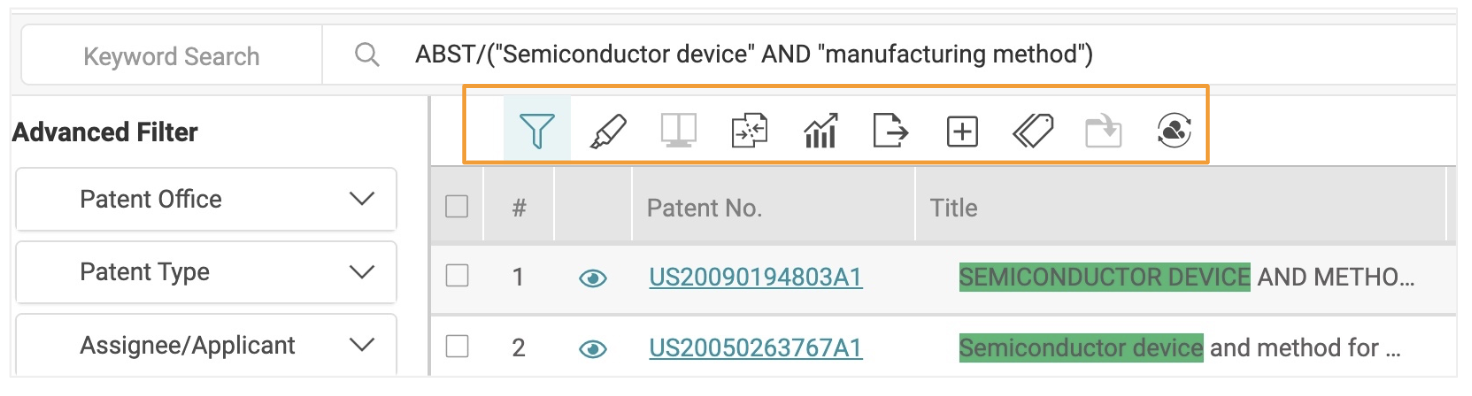

The tools (from left to right) are:
- Filters — Open the Advanced Filter panel
- Highlighter — Highlight keywords on the search results page
- Compare — Compare the selected patents in the result list
- Collapse — Collapse results by Family or by Application No.
- Statistical Chart — Generate basic charts (line, bar, column, and pie)
- Export — Export the patent list or a PDF file
- Expand — Expand results to show all Simply Family members
- Tag — Apply self-defined tags to the selected patents
- Add to Project — Add selected patents to the folders in your project
- Forward to — Forward selected patents to Due Diligence (for patent portfolio evaluation) or Quality Insights (for patent validity analysis)
Advanced Filter
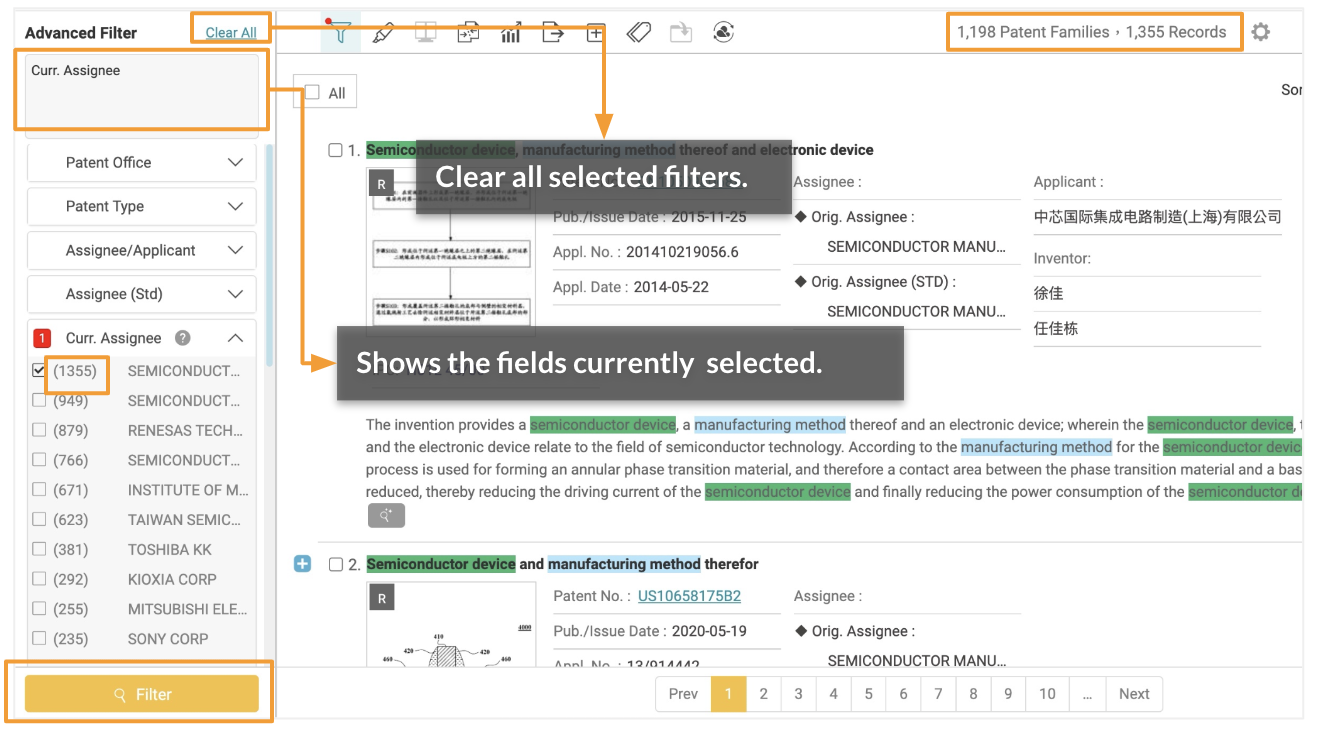
Patent Search users can further filter the search results by using the advanced filters on the left-side of the search results page. You can filter your results by PTO, patent type, assignee/applicant, assignee (Std), current assignee, inventor, legal status, abandon type (for abandoned legal status), quality, value, IPC, CPC, Locarno, USPC, FI, agency, primary examiner, and kind code. Each filter shows the first 10 items. Click on More+ to show the next 10 items.
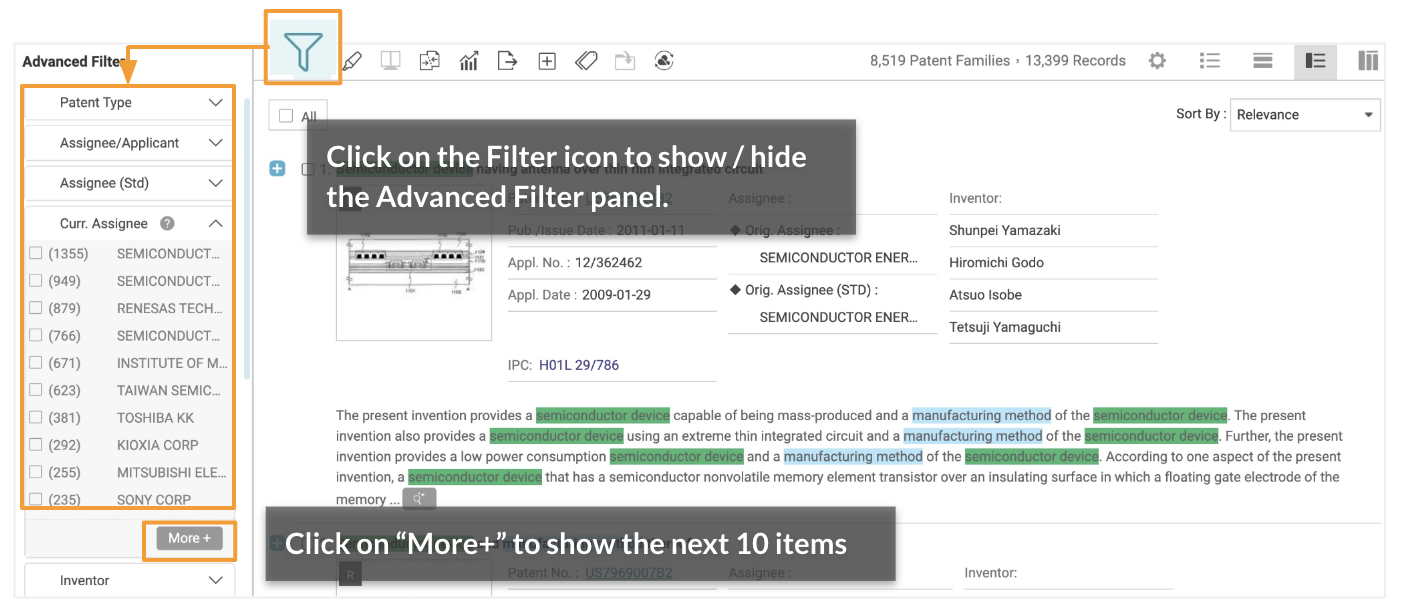
The number of matches shown next to a filter item is based on the initial total of search results and will not automatically update after filters have been applied. After selecting the filter items and clicking on Filter, you will see the number of records found from filtering the search results on the upper right-hand corner.
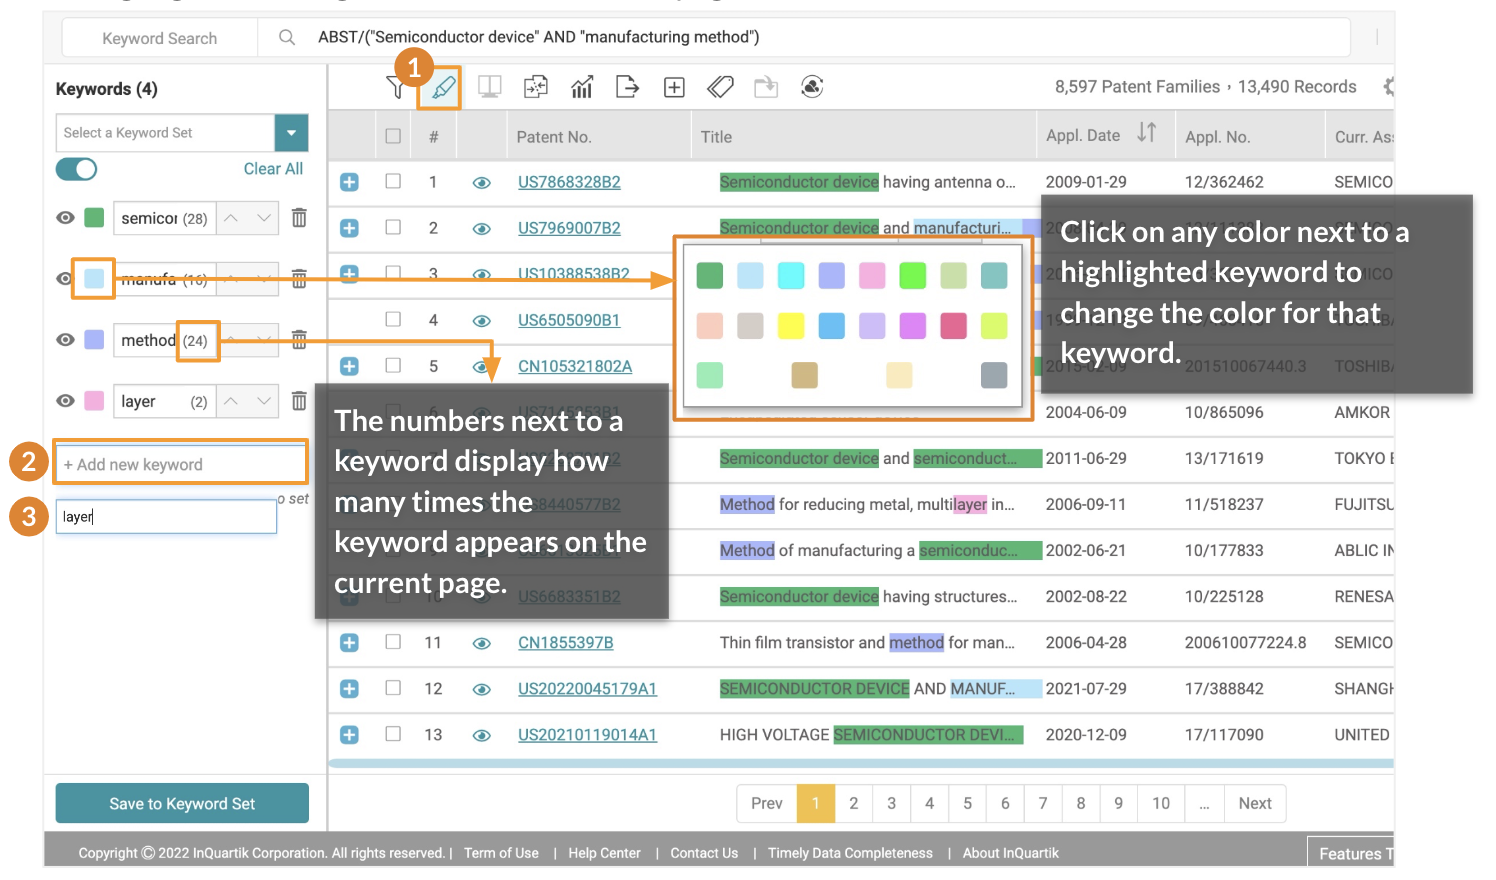
Highlighter
The keywords from your search are automatically highlighted on the search results page.
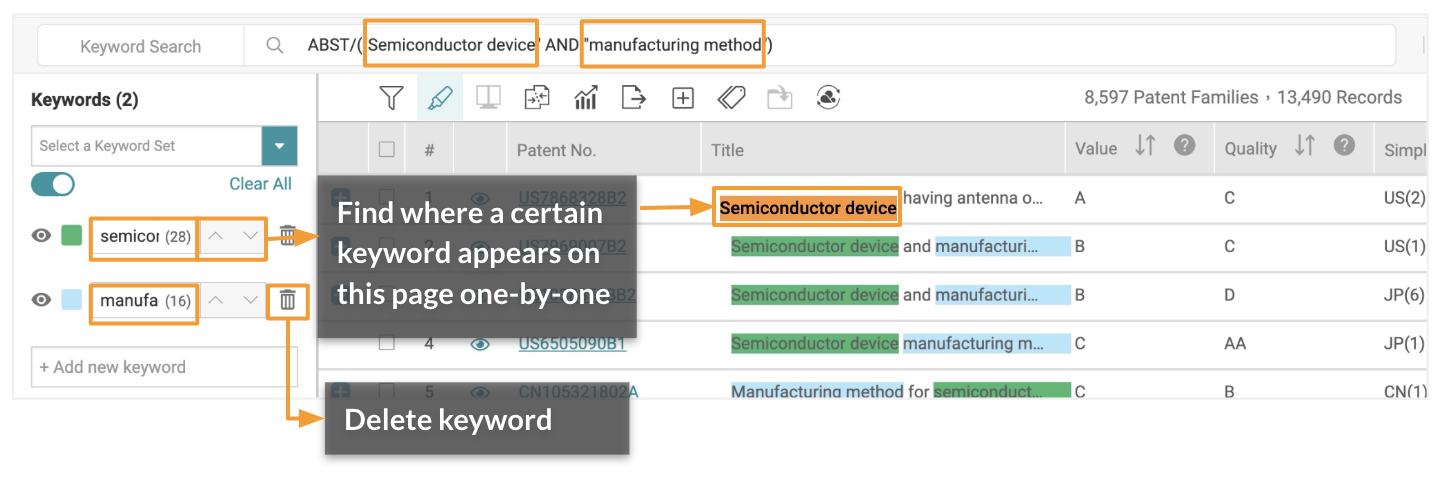
To highlight more keywords:
- Click on Highlight icon on the tool bar.
- Click on the +Add new keyword field on the Highlighter panel on the left.
- Enter a specific word or phrase in the text box and press Enter. The keyword will then be highlighted throughout the search results pages.
Use “Save to Keyword Sets” to store your frequently-highlighted keywords.
- Click on the Save to Keyword Set button to save keywords. You can save up to 10 keyword sets that can store up to 40 keywords each.
- Select an empty set where you want to save the keywords. By default, they are named Set 1 to Set 10, which can be renamed.
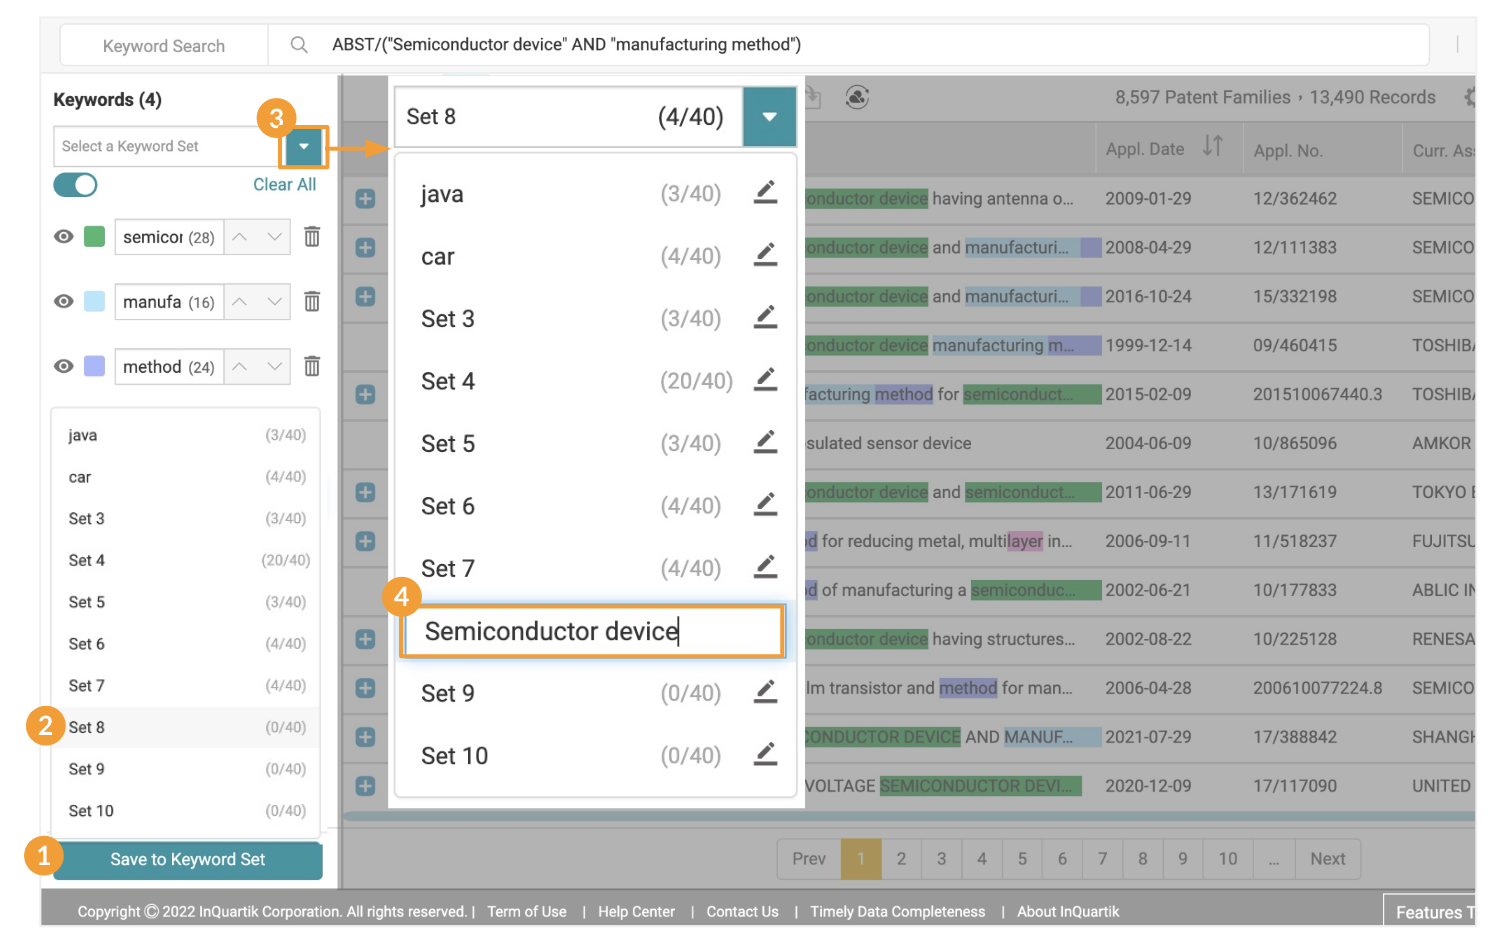
Rename a Keyword Set:
- To rename a Keyword Set, click on Select a Keyword Set from the dropdown list.
- Click on the Edit icon, rename the set and press Enter.
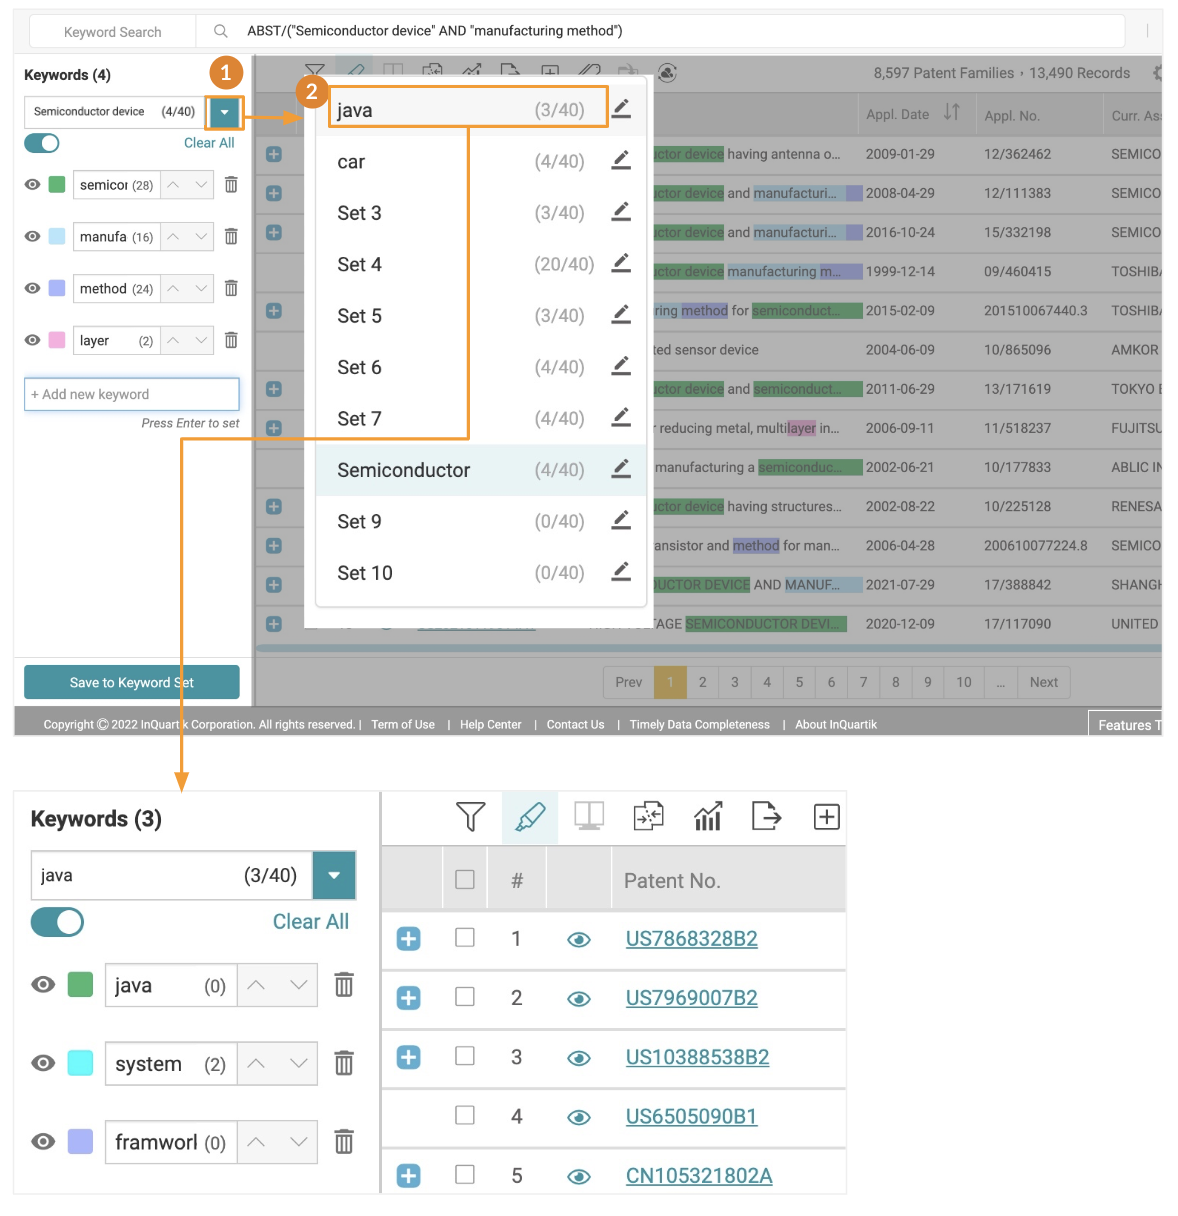
To select another keyword set to view:
- Click on the dropdown list at the top of the Highlighter panel.
- Click on the saved set you want to replace the existing set with.
Compare
The Compare tool in Patent Search and Patent Vault lets you compare two patents quickly and easily, whether on the search result page or in your folder.
To compare patents:
- Select the patents you want to compare by ticking the corresponding checkbox(es). You can select up to 20 patents.
- Click the Compare icon. The comparison page will open in a new tab.
- On the document comparison page, drag and drop any patent to either side of the reading panel. You can also compare the information of a single patent by dragging and dropping that patent to both panels.
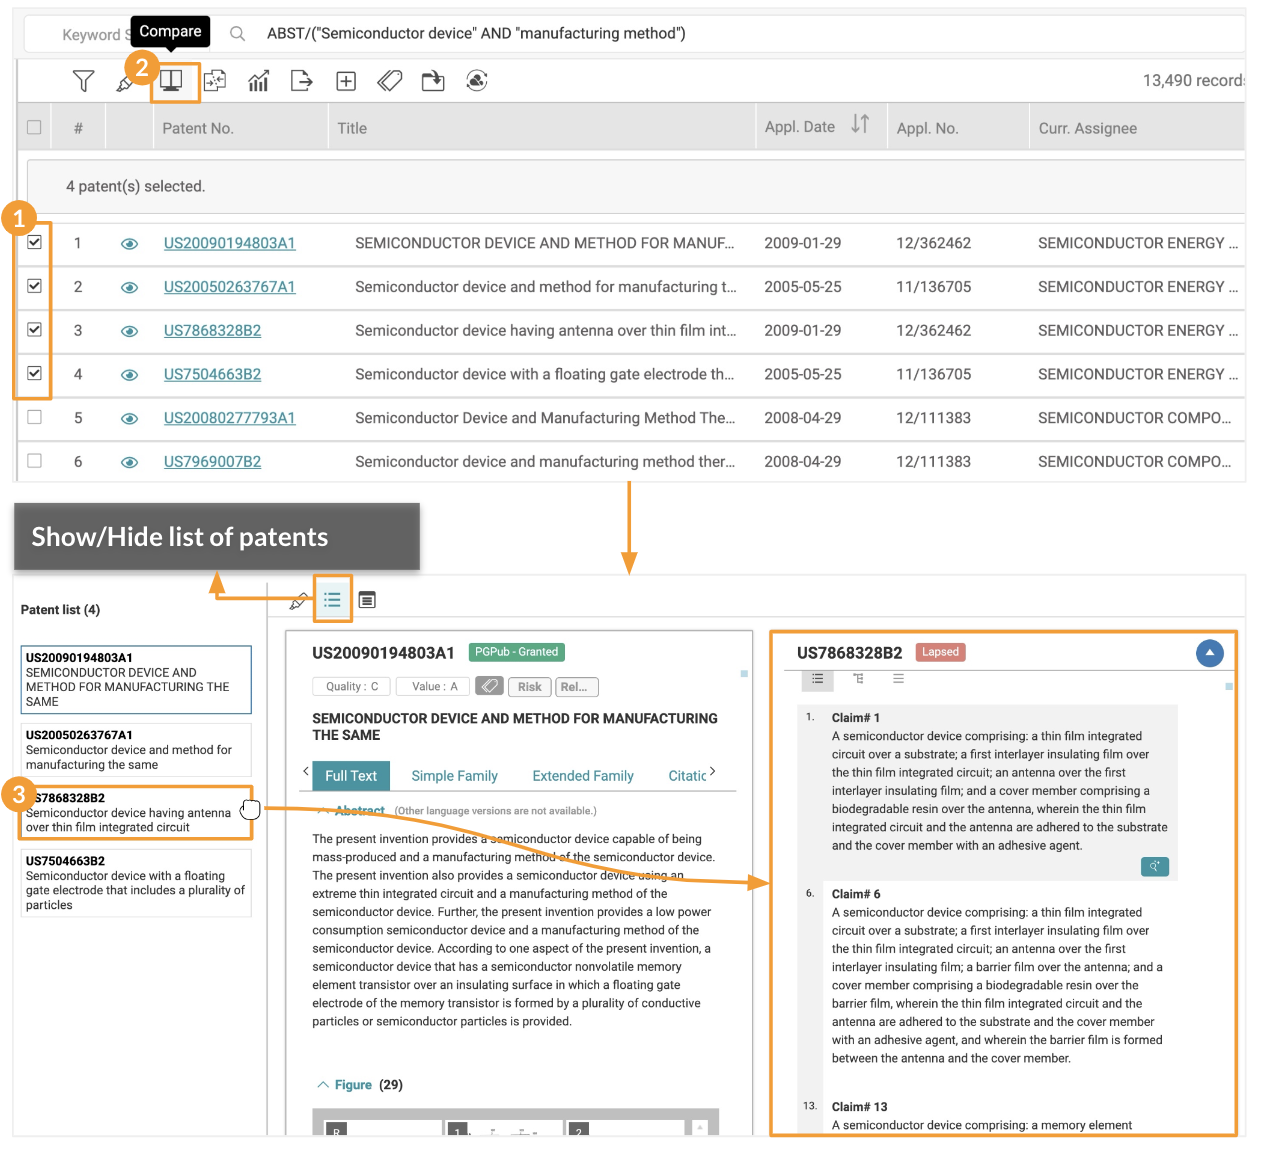
Patent Search also provides Highlighter and Memo tools that are available on the document comparison page.
Collapse
Collapse results by application number or by family.
To collapse patents:
- Click on the Collapse icon.
- Select whether you want to collapse the results By Application No., By Family, or None. The screen will present the collapsed results.
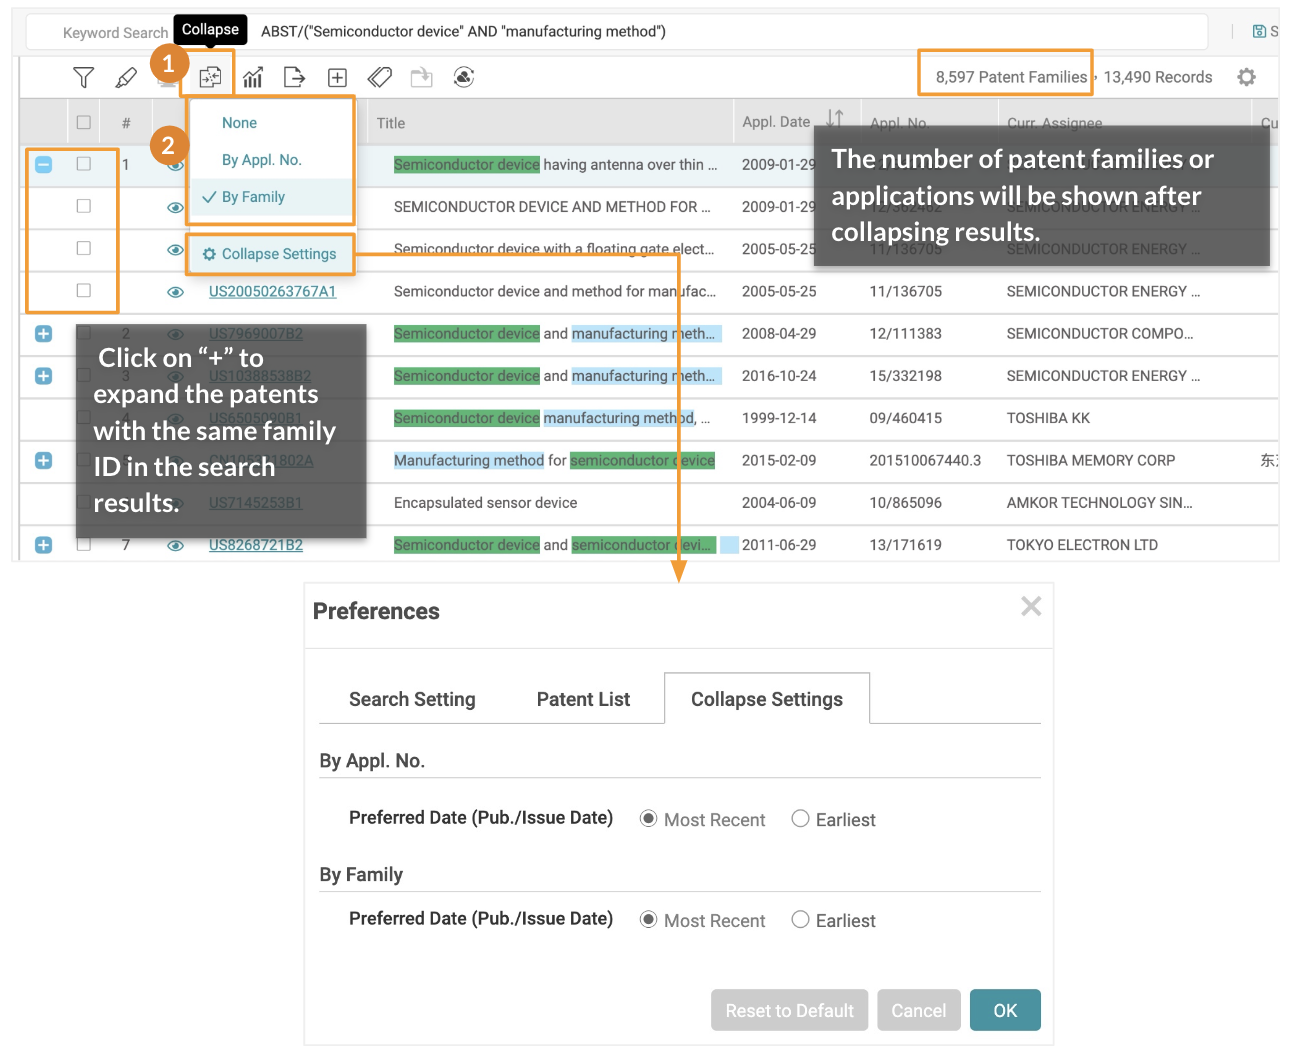
For Quick Search, Advanced Search, and Number Search, the representative patent shown in the results after collapsing may differ depending on your preference settings. E.g., If the setting is set as "Most Recent” and collapsed by Family, the representative patent of each family would be the patent with the most recent Pub./Issue Date.
For Semantic Search, the order of the results (#) will still be based on the family member with the highest semantic similarity.
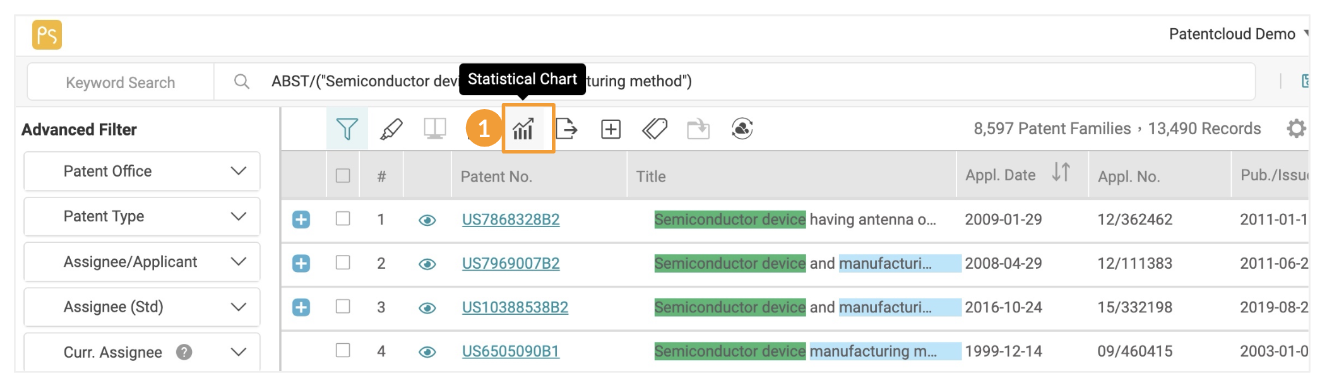
Statistical Chart
Perform basic analyses of your search results in Patent Search by creating visual charts. The Statistical Chart tool allows you to generate line, bar, column, and pie charts.
To create a chart:
- Click on the Statistical Chart button to open the statistical chart feature in a new tab in your browser.
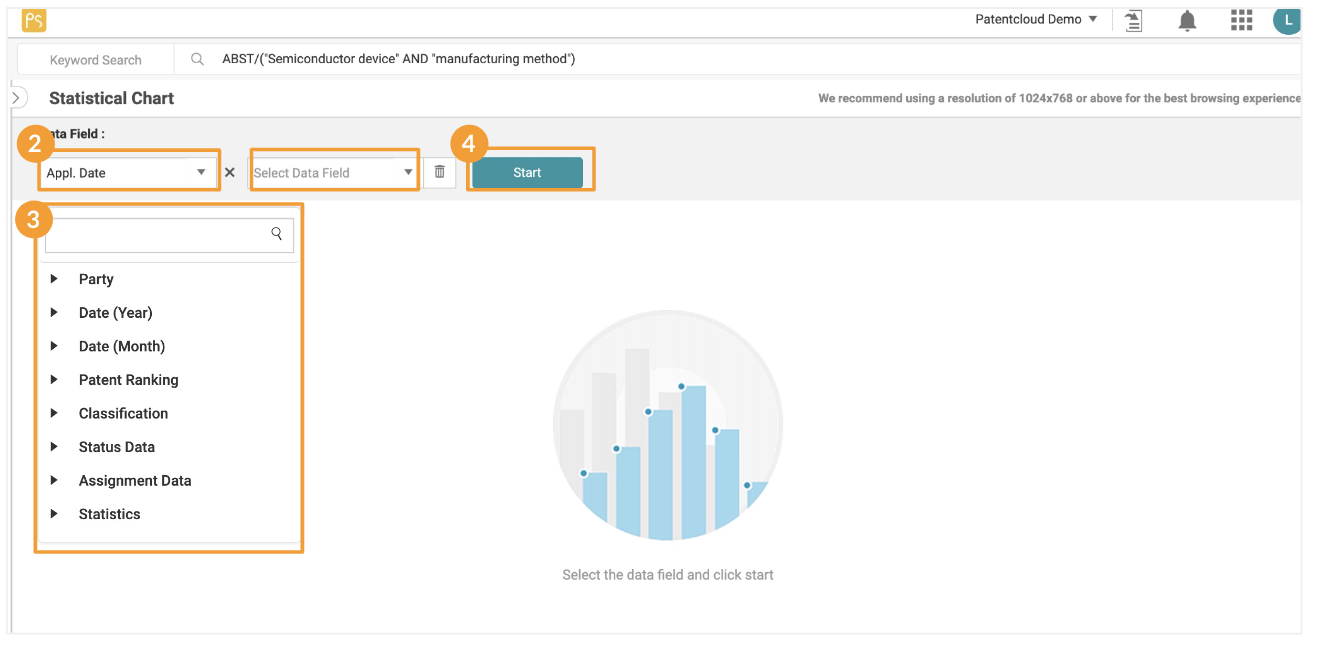
- Click the drop-down menus in the Data Field section to view the various data fields.
- Use the drop-down menu(s) to select the data fields for generating the statistical chart.
- After selecting the desired data field(s), click Start to create a statistical chart. In this case, two data fields were selected.
After generating a chart, you can use the various tools on the statistical chart page to customize the data used and displayed in the chart.
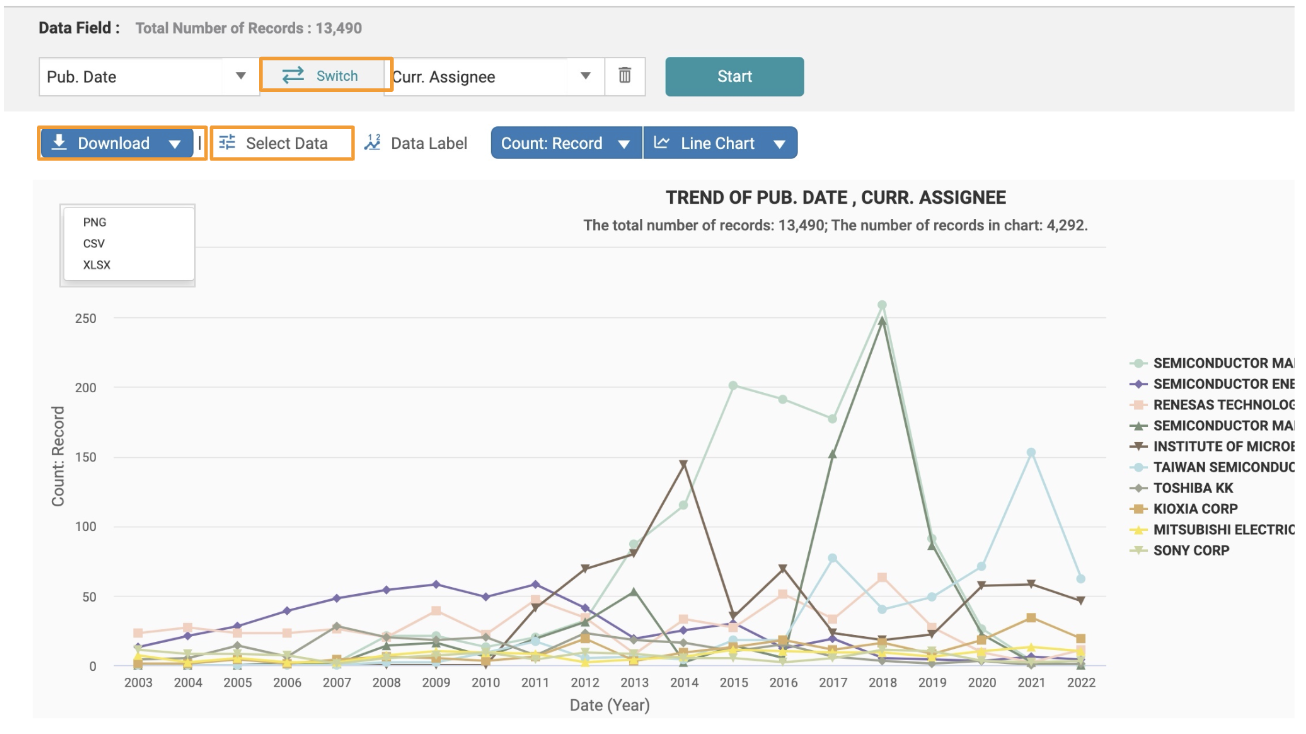
Statistical Chart tools:
![]()
Switch
If a chart consists of two data fields, click on Switch to switch the X and Y fields. Click Start to re-generate the chart.
Download
You can download the chart as a .png image file, or the data in .csv or .xlsx format.
Select Data
By default, the Statistical Chart provides the top 10 records when analyzing the selected fields. Use Select Data to adjust the number of records displayed. You can select up to 100 records; those that exceed this number will not be shown.
Note: If you use the “Classification” item, it can only be used in the X field for single-field analysis. If you want to compare it with another item, the Classification item can only be selected under the Y field.
Data Label
Click on Data Label to show the data values in the chart.
Count
Choose how you want to view the data count — by records, applications, or family.
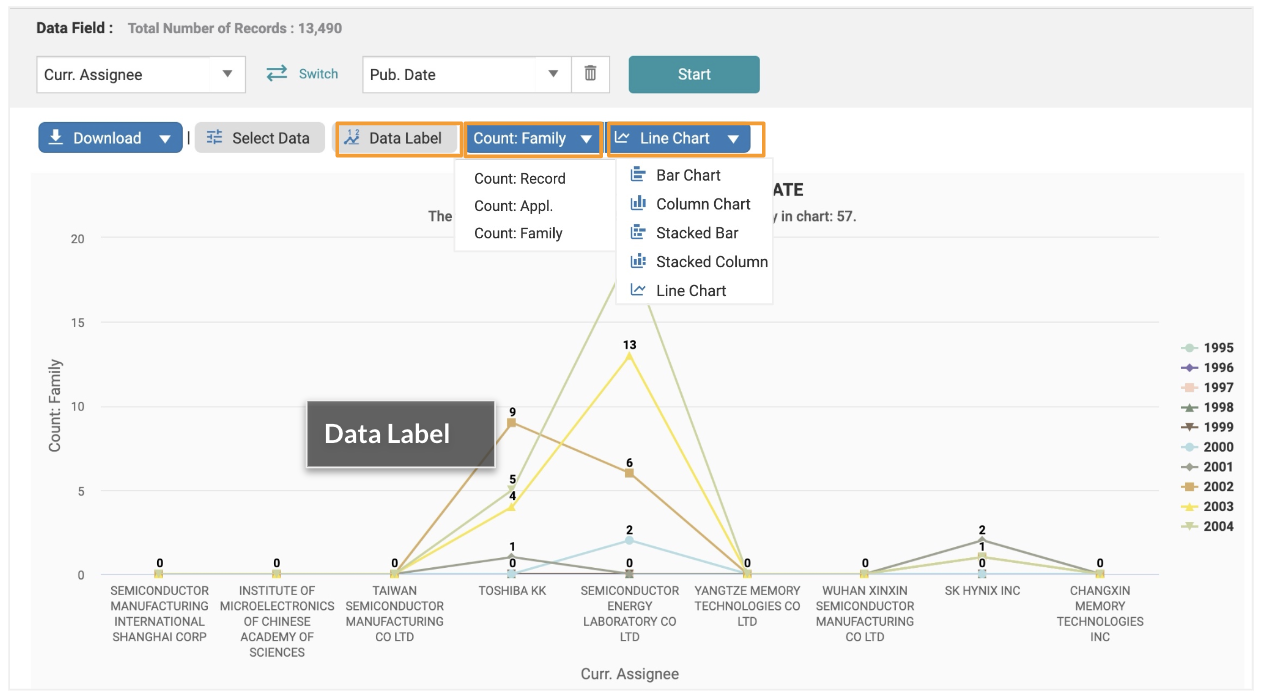
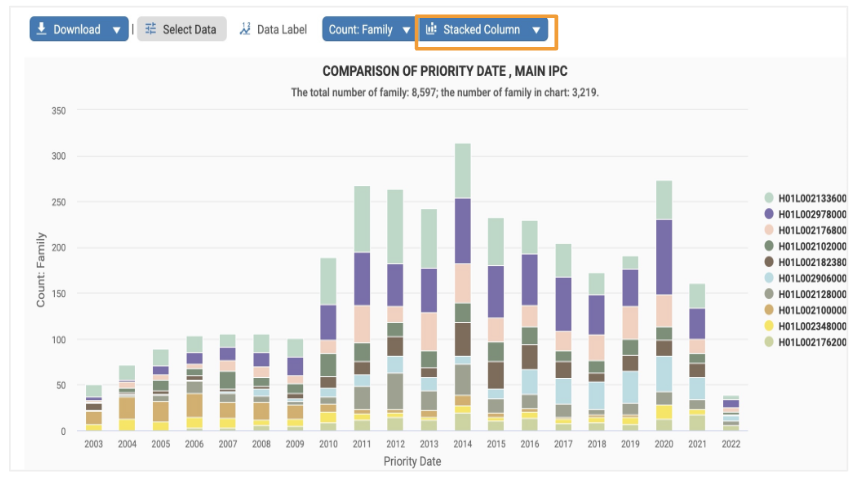
Chart Type
Press the Chart button to select the type of chart you prefer (line, bar, column, or pie). Please note that only the line chart supports time-related data fields.
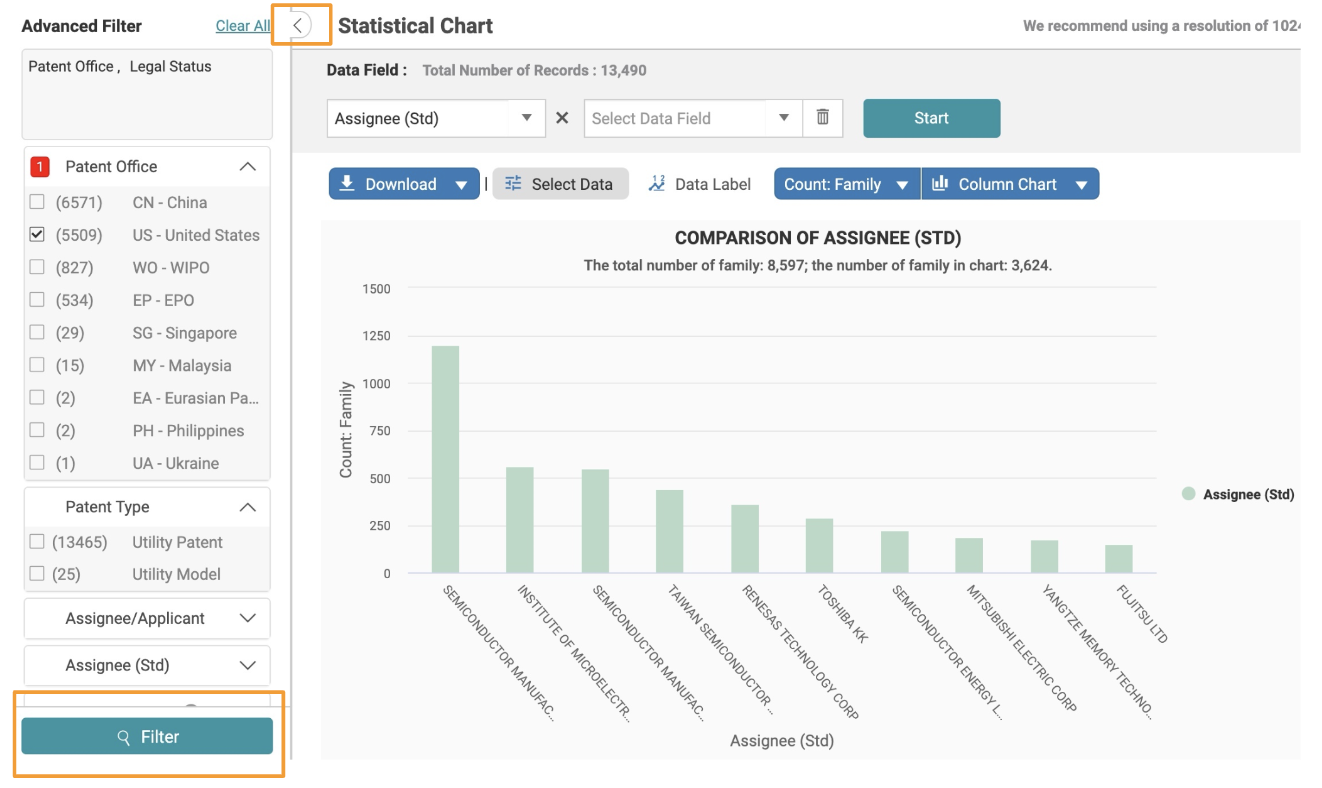
Filter
You can further narrow down your search by using various parameters to filter your search results. Select the parameters you wish to filter by (on the left-hand side of the page), and then press Filter. If you cannot see the filter panel, click on the expand arrow icon on the upper left.
Export
You can export your search results in various file formats, including a patent list (.xls or .csv), a full-text patent document (.zip), and the front page of a patent document (.pdf).
To export patents:
- Select the patents you want to export or click on the Export icon to select all results. A pop-up window will appear.
- Select the file format you want.
- Select which items and fields to export. (Please note your export quota*.)
- Name the file.
- Then, click Export to start downloading the file.
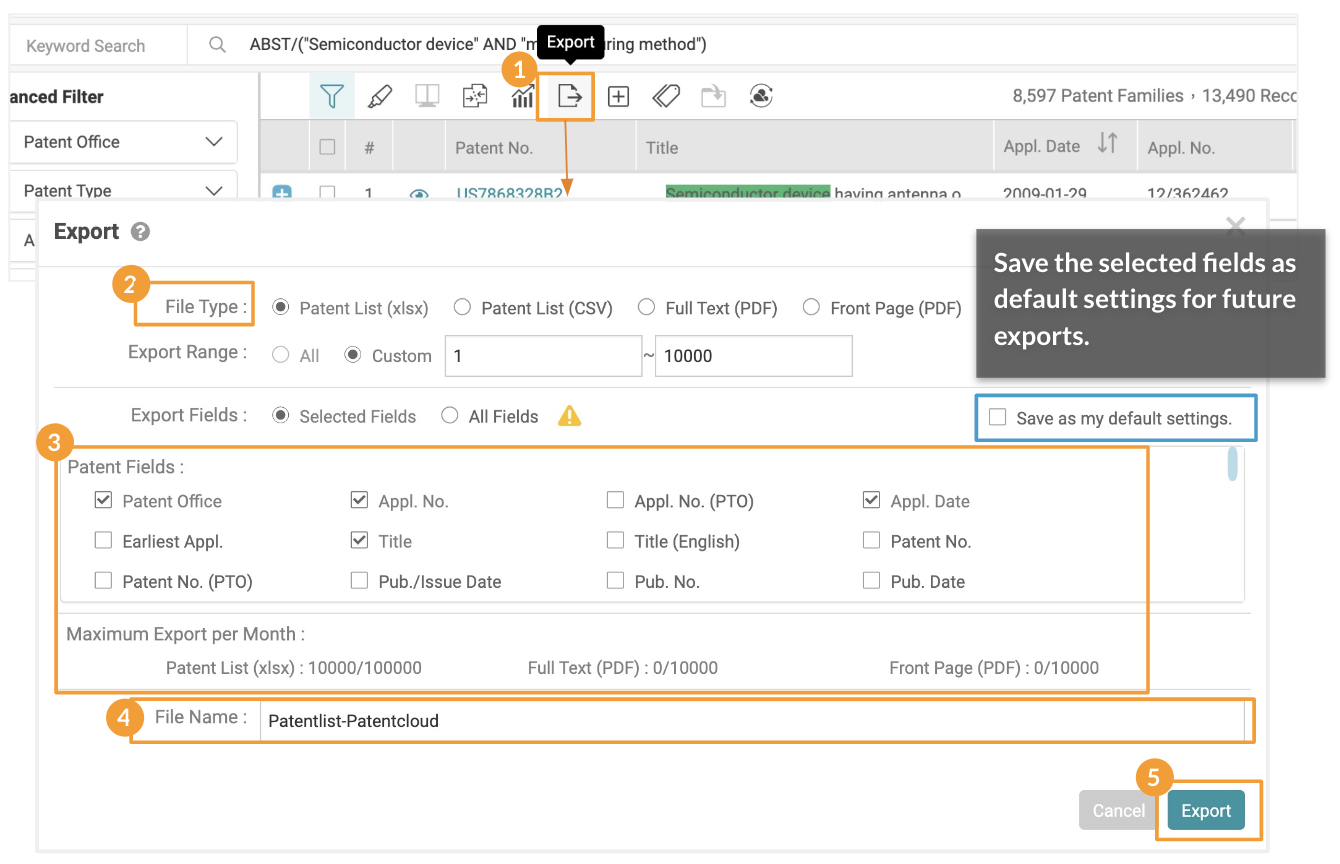
* Export Quota:
Patent Search monthly export quota: 10,000 patents (.xlsx/.csv) and 1,000 full page/front page patents (.pdf).
Export Options: Representative Patents Only
If your search results are collapsed by application number or family, there will be an additional option for you to select — Export Options: Representative Patent Only.

Expand
Expand your search results and find a patent’s family members through family identification.
To expand patents:
- Select the patents you want to expand.
- Click on the Expand icon.
- Then, click Expand by Family to open a new browser tab with the expanded family results.
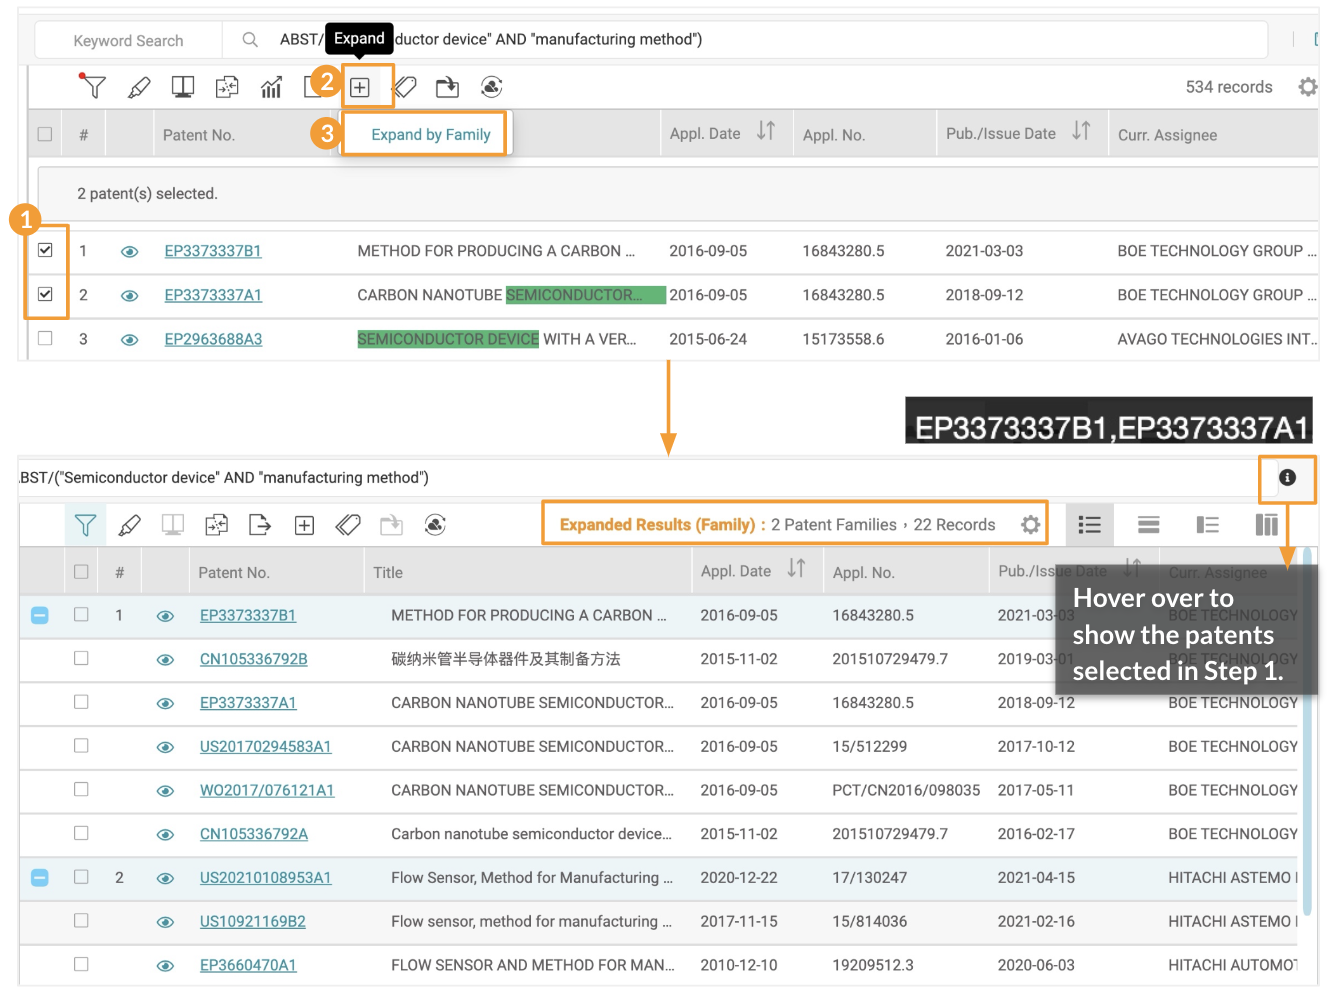
Note: The Expand function is available for a query scope within the maximum amount of 6,000 records. If the query result exceeds the limit, amend your query or use filters to adjust the scope if needed.
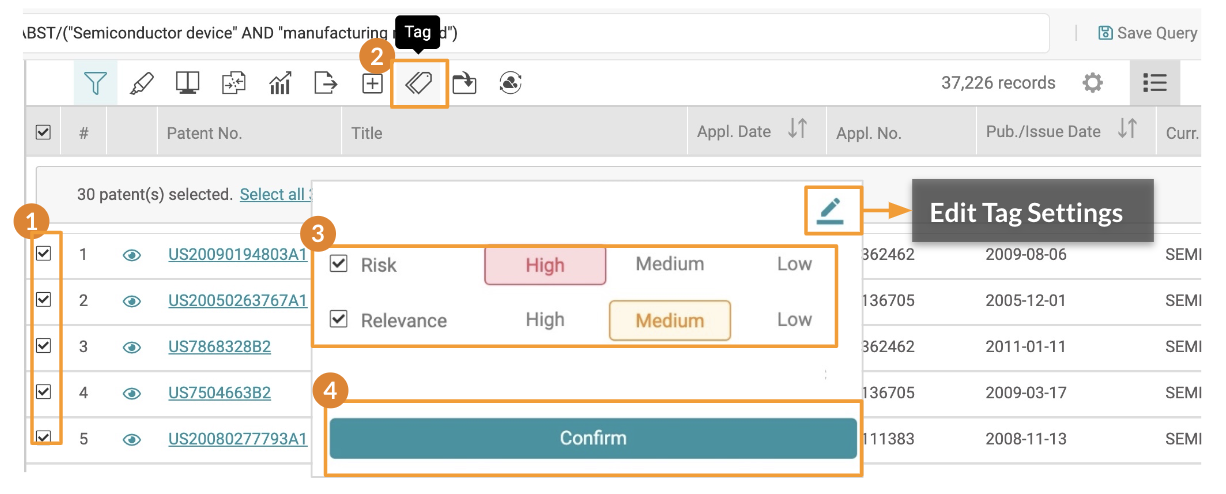
Tag
Apply self-defined tags to the selected patents on the search result page. All tagged patents will be saved in a separate Tag folder in your Patent Vault project.
To tag patents:
- Select the patents you want to tag.
- Click on the Tag icon from the toolbar.
- You can choose from the default labels: Risk and Relevance, and select the type or ranking, say, either High, Medium, or Low. Click Confirm once you are done tagging.
- You can view the tagged patent(s) in your Tagged folder in Patent Vault.
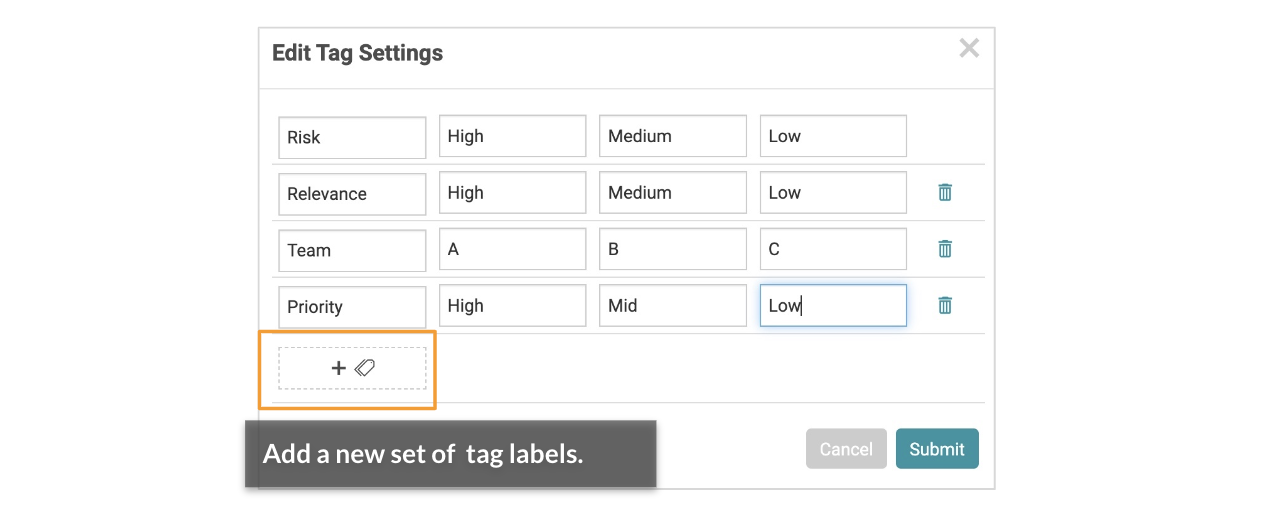
Edit Tag Settings
By clicking on the Edit icon, you can customize your labels. You can create a new label, and give it a subject, a label name, and a range. You can set up to 10 types of Tags.
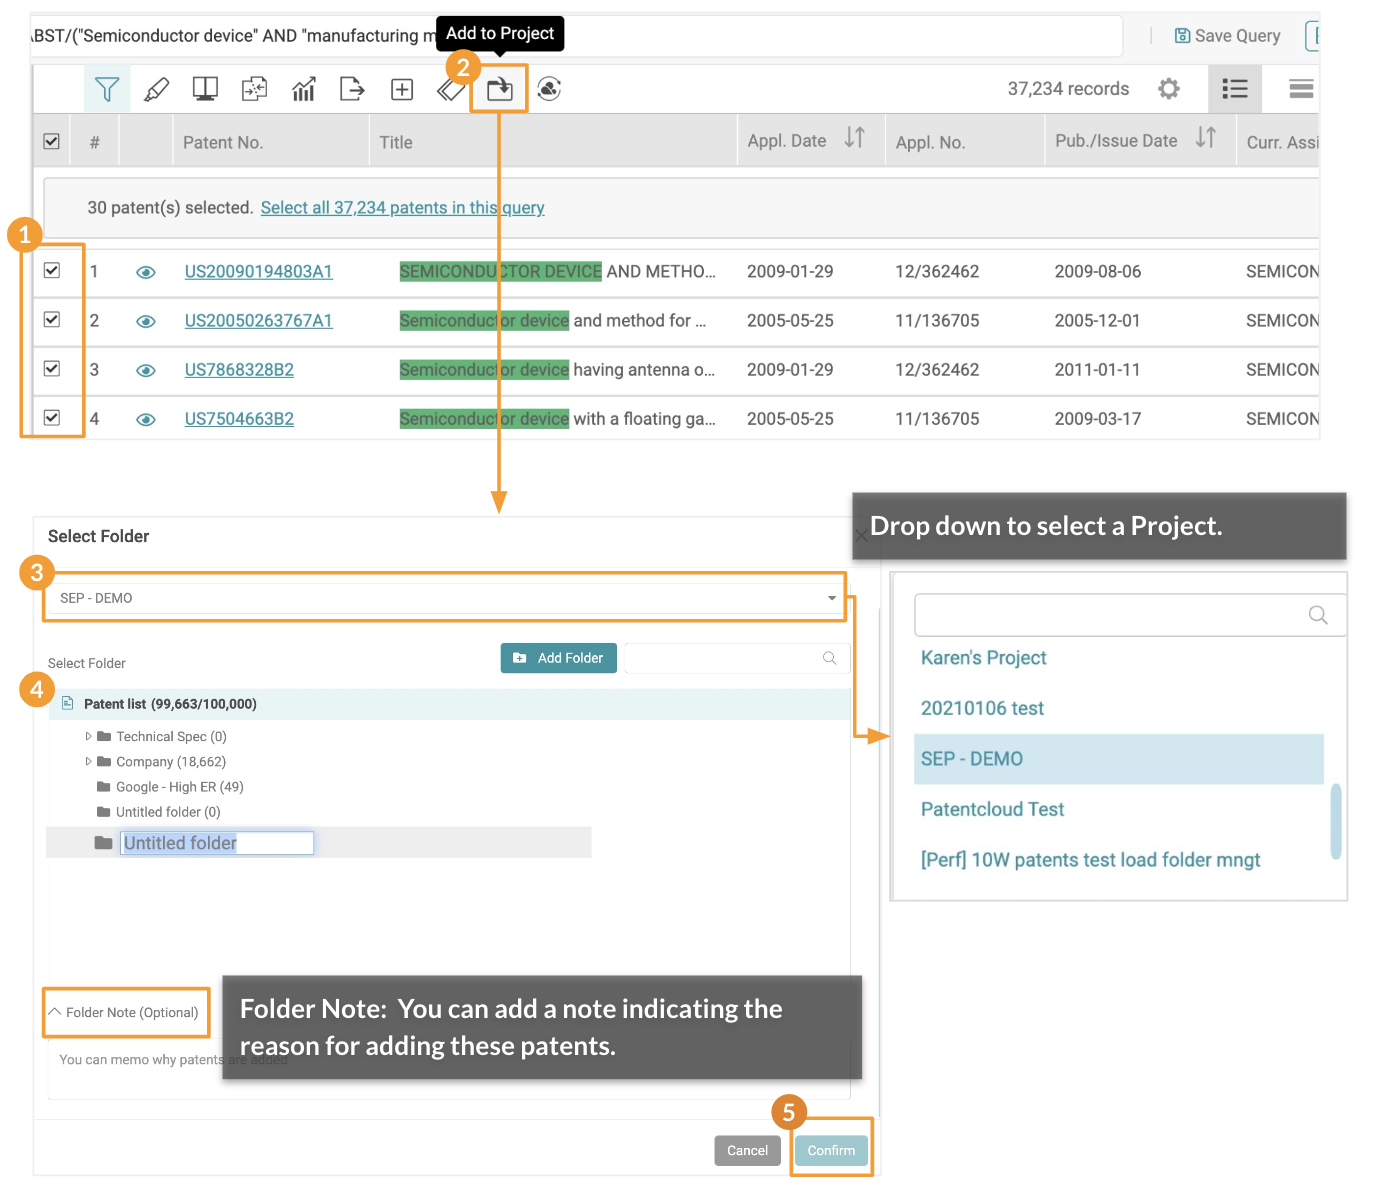
Add to Project
Add selected patents into your Patent Vault project folders to share and analyze your findings.
To add patents to a project:
- Select the patents you want to add to a project.
- Click on the Add to Project icon. A pop-up window will appear.
- On the Select Folder window, select a destination (Project) for the patents.
- Select an existing folder by clicking on the folder name. Or, create a new folder by clicking on the Add Folder icon and naming the new folder.
- Then, click Confirm.
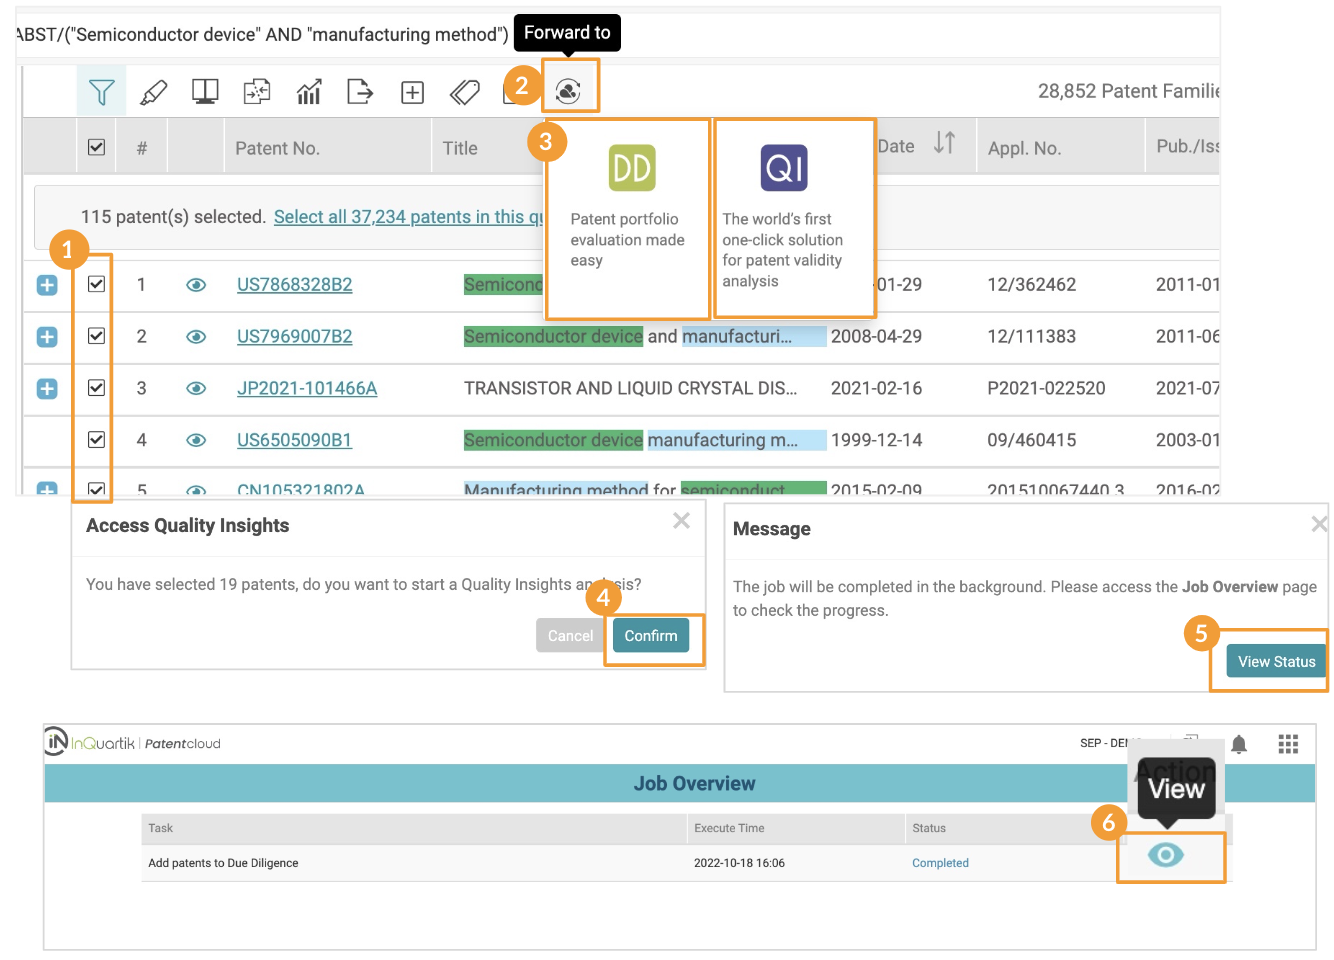
Forward To
Forward selected patents to Due Diligence (for patent portfolio evaluation) and Quality Insights (for patent validity analysis).
To forward patents:
- Select the patents you want to forward to Due Diligence or Quality Insights*.
- Click on the Forward to icon.
- Select DD (Due Diligence) or QI (Quality Insights).
- Click Confirm on the pop-up window (When forwarding patents to Quality Insights, the Quality Insights Search Summary page will be opened in a new tab.)
- When forwarding patents to Due Diligence, click View Status to view the task's progress on the Job Overview page.
- Click on the eye icon on the Job Overview page to open the Due Diligence’s Dashboard.
* You can forward up to 100 patents to Quality Insights.